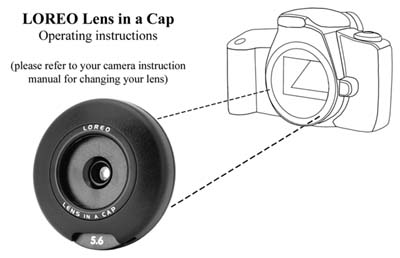
Welcome to the LOREO Lens in a Cap(please refer to your camera instruction manual for changing your lens)
General Instructions
- With the normal camera lens removed, line up the index mark on
the back of the Loreo Lens in a Cap (fig 1 #9) with the index mark on your
camera body and attach it to the camera.
- If you are using an M42 screw mount adaptor on your camera, consult the adaptor instructions before mounting the Lens in a Cap.
- When you wish to take a photograph, select an aperture by turning
the aperture disc (fig 1 #4) in either direction making sure it clicks into
place. Check out http://www.loreo.com for more information on aperture selection.
Please note your Lens in a Cap is not fitted with an auto diaphragm so the
image in the viewfinder darkens as smaller apertures are chosen. This gives
the user an opportunity to judge depth of field, and has no adverse effect
on the final picture. F16 and f32 offer the best sharpness. If your viewfinder
is totally black, make sure an open aperture is chosen. Your Lens in a Cap
may have been delivered with the blank aperture position selected.
- For correct exposure control, consult a light meter or the exposure
chart often provided with your film. You may also use TTL flash, Aperture
Priority (AV) or Program (P) mode auto exposure control with most cameras.
- When you are ready to try taking close up photos, the Loreo
Lubot is designed to clip into the Lens in a Cap accessory mount. (fig 1
#2) Used together, they turn your SLR camera into a macro camera yielding
1.5X magnification (1.5:1) on a negative or slide. This becomes 6X magnification
(6:1) when viewed on a 4R print.
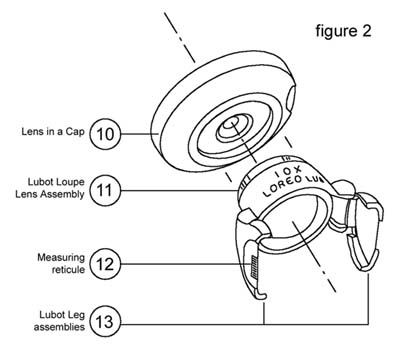
- To use the optional Lubot Loupe attached to the Lens in a Cap
for fixed focus Macro photography, press the Lubot gently into the Accessory
Holder (fig 2). The Accessory holder is designed to hold the Lubot with slight
spring tension.
- When the optional Lubot is attached, the plane of focus falls
exactly at end of the Lubot legs (fig 2 #13), but only when the Lubot diopter
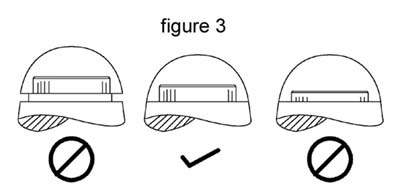
adjustment is at "zero". In order to "zero" adjust the Lubot, place the protective
dome which came with your Lubot snugly on the loupe with the lens assembly
screwed out as high as possible. Turn the dome and lens assembly together
until the bottom edge of the dome just touches the Lubot body. (fig 3) Your
Lubot is now set at "zero." Care should be taken when removing the Dome after
adjustment so as not to disturb the "zero" setting.
- Slight adjustment of the plane of focus can now be made by turning
the lens assembly of the Lubot down, lowering the plane of focus or
turning it up, therefore bringing the focus up, inside the ends of the Lubot
legs.
 |
 |
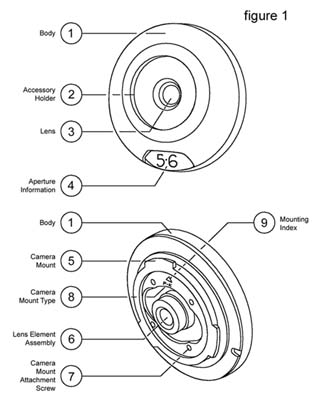
1. Body
2. Accessory Holder
3. Lens
4. Aperture information
5. Camera Mount
6. Lens Element Assembly
7. Camera Mount attachment screws
8. Camera Mount Type
9. Mounting Index
|
(with optional Lubot)
10. Lens in a Cap
11. Lubot Loupe Lens Assembly
12. Measuring reticule
13. Lubot Leg assemblies
|
 |
Care and Troubleshooting
- While your Lens in a Cap is not waterproof, it is water resistant.
Rain or salt water splashes on the Lens in a Cap body (fig 1 #1) should be
harmless. Simply wipe them off with a clean cloth. A soiled lens may be gently
cleaned with lens tissue moistened with lens cleaning fluid or by breathing
on the lens surface. Never put liquid lens cleaner directly onto any lens.
Do not wipe with a dry tissue as it may scratch the lens surface.
- If
you use the Lens in a Cap with a Lubot for taking ultra-macro
photographs take care not to knock the Lubot off its mount while
adjusting the camera.
- When a Lubot is attached to the Lens in a Cap do not disengage
it by twisting it. Twisting it too far may result in tightening the eyepiece
diopter so as to make it difficult to loosen.
- If you over-screw the eyepiece upwards (fig. 3 left) it
can be loosened by turning it clockwise while facing upwards. The eyepiece
has a right hand thread.
- If you over-screw the eyepiece downwards (fig. 3 right) it can be loosened by turning it counter-clockwise while facing upwards.
- - - - -
Return to the Loreo Homepage.
E-mail: info@loreo.com
|