Welcome to LOREO stereo photography (3-D)
This manual has three parts:
1. How to use the camera. If you already own a 35mm camera, most
controls and instructions will be familiar to you.
2. Viewing LOREO 3-D pictures.
3. Tips
for taking 3-D pictures.
Packing List
- Photokit MKII 3D Camera
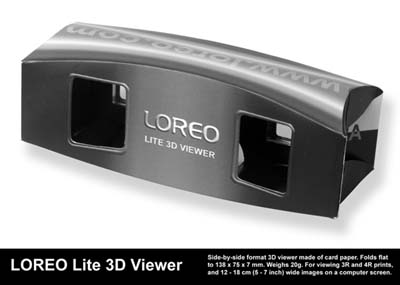
- Lite 3D Viewer
- Deluxe 3D Viewer (optional)
- Carrying Pouch
- Camera Strap
- Lens Shade
- Operation Manual
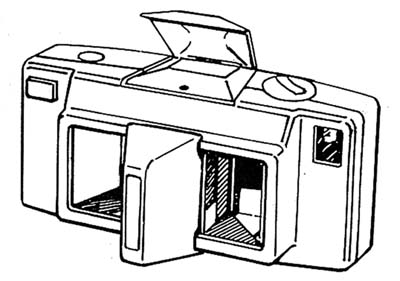
The Photokit MKII 3D
Camera
Your Loreo 3-D camera uses ordinary 35mm 400 ISO speed film and requires no special processing or printing. Simply have your film processed and printed as usual. The prints will automatically show two different views of your picture, which allows you to enjoy viewing full stereo depth using a 3D viewer. You will be able to see your pictures with a realism no ordinary camera can give you.

What film to use:
You can load your LOREO camera with any ordinary 35mm color negative films (12 or 24 or 36 exposure length) of ISO 200 speed or greater. If you use 400 ISO speed film, you benefit from increased flash range and increased performance in low light level outdoor situations. No special processing is needed. Simply ask for prints (preferably matte surface) in size 3R (9x12.5 cm, 5"x3.5"), if not available 4R (10x15 cm, 6"x4").
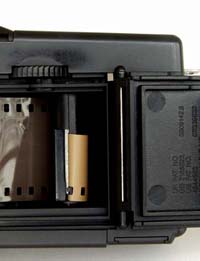
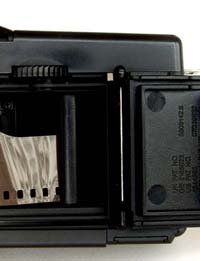
Film loading:
Open the camera door by pressing the door catch (4). Push up the film rewind knob (7) and insert the film cartridge into the left-hand chamber and push the rewind knob back into place.
Pull out about 4 inches of film and insert the tip of the film into the slot of the take-up spool. You can put this slot into a convenient position by slightly turning the film advance wheel (9).
Turn the film advance wheel wind on the film until the double perforation width is over the film sprocket wheel inside the camera, along the film path. In that position, the full width of the film covers the picture window inside the camera and the teeth of the sprocket wheel have engaged in the lower film perforation wholes. If you cannot turn the film advance wheel (9), press the shutter release button (1) to unlock.
Film correctly loaded
|
Film not engaged
|
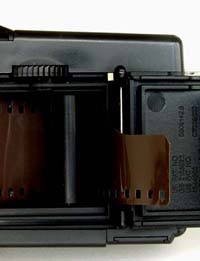
Tongue out of spool
|
The Loreo Photokit camera has a curved film plane. This is one of the key features which made it possible to design a photo lab compatible 3D camera which is so compact. To ensure a good register between the film and the film gate, the take-up spool turns in the opposite direction to most point and shoot cameras, thus drawing the film naturally across and close to the film gate. When loading a new film into the camera, it is important to make sure the tongue of the film is WRAPPED AROUND the take-up spool and the sprocket is engaged on the film before closing the back. Failure to do this may result in the tongue jumping out of the slot of the take-up spool, in which case the camera will still appear to wind on normally a few times but will become progressively stiff to wind as the film transported by the sprocket is not taken up by the take up spool.
Before closing the back make certain that the film is securely attached to the take-up spool. Securely close the back and turn the film advance wheel until it stops and then press the shutter release button. Repeat this action until the film counter (8) shows "1". The film rewind knob (7) will normally turn when the film is correctly transported.
You are now ready to take your first picture.
Focusing:
3-D pictures require a wide sharpness range so that near and distant objects are shown with equal sharpness. Your camera has been set so that pictures can be taken from as close as 80 cm (2.5 feet) to infinity. The camera has no device for manual focusing adjustment.
Exposure:
Your camera is fitted with a fixed exposure setting and so no exposure adjustments are necessary. If the low light sensor (12) glows red when you slightly press the shutter release button, there is not enough light to take a perfect picture outdoors. Indoors simply switch on the flash system, remembering the distance range within which the flash can be used with good results.
Flash pictures:
To activate the flash push the Flash selector switch (10) to the left and the flash will spring open. Best results are obtained if your subject is between 1.5m (5 feet) and 2.5m (8 feet) from the camera. 400 ISO speed film increases that range to 3.0m (9 feet).
To close the flash reflector, simply push the reflector hood down with your hand until it locks. To conserve the batteries always
switch off the flash by closing the reflector hood when not needed.
Batteries:
To open the battery compartment, slide battery door (6) out by pushing it in the direction of the arrow. Your camera holds two AA size or type MN-1500 1.5V batteries that you must insert as shown on the illustrations below with the camera pointing downwards.
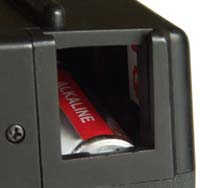
First battery correctly loaded. Now load the second battery.
|
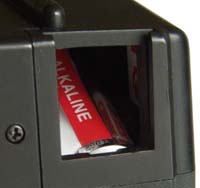
First battery tilted. Take it out and reload. Do not use the second battery to force it in.
|
Insert the first battery so that the polarity is correct and it drops into the compartment. If it is tilted, take it out and re-load. Never use the second battery to force it into position. If you do this you risk damaging the contacts and jamming the camera. Insert the second battery with the + side out. If you have correctly inserted the batteries, the first one will be hidden in the camera body, of the second one the + side will be visible in the open battery compartment. Now slide the battery door back while guiding the metal tab under the battery cover between the camera housing and the battery terminal.
Unloading your exposed film:
After taking all of your 12 or 24 or 36 exposures the film must be rewound back into the cassette to be sent away for processing. To rewind the film press the film rewind release button (5) on the base of the camera and hold in, at the same time fold out the rewind knob (7) and turn clockwise to rewind the film back into the cassette. Continue to turn the rewind knob until the film is completely rewound back (as the film disengages frorm the take-up spool a slight decrease in pressure on the rewind knob will be felt). After this turn the rewind knob 5 or 6 times to make sure the film is completely back into the cassette.
Warning: Do not press too hard on the film rewind release button. This button does not stay retracted while the film is being rewound. Pressing too hard on it may cause it to jam.
Keep the picture window clean
The unique twin lens system of the LOREO stereo camera is located behind the front glass. This glass should be kept clean using either a
spectacle cleaning cloth or lens cleaning solution.
Avoid touching the front glass but if fingermarks are put on this glass it can be cleaned gently by using a good quality paper tissue.
Viewing LOREO 3D pictures with Prints:
Your LOREO 3-D stereo camera has a unique twin lens system which takes two pictures for each exposure. You can immediately view these pictures, after they have been returned from processing, by using the special LOREO viewer.
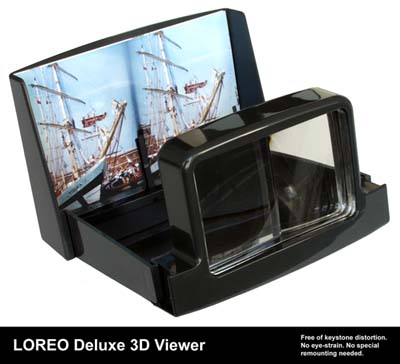
Put the pictures in the LOREO viewer picture frame and hold the viewer about 6 inches from your eyes. It will take a few seconds for your eyes to "adjust" to the stereo picture when you will find the picture you are viewing will suddenly "snap" into stereo. According to different peoples eyesight you may have to move the viewer either closer to your eyes or further away to obtain the stereo effect.
For the best clarity on viewing the stereo pictures it is important that you avoid bright lights (windows, lamps) to reflect on the viewing lens surface. Natural light falling on the stereo print, not on the stereo lens, will always give you the best stereo effect. An evenly and brightly lit print will have maximum stereo quality.
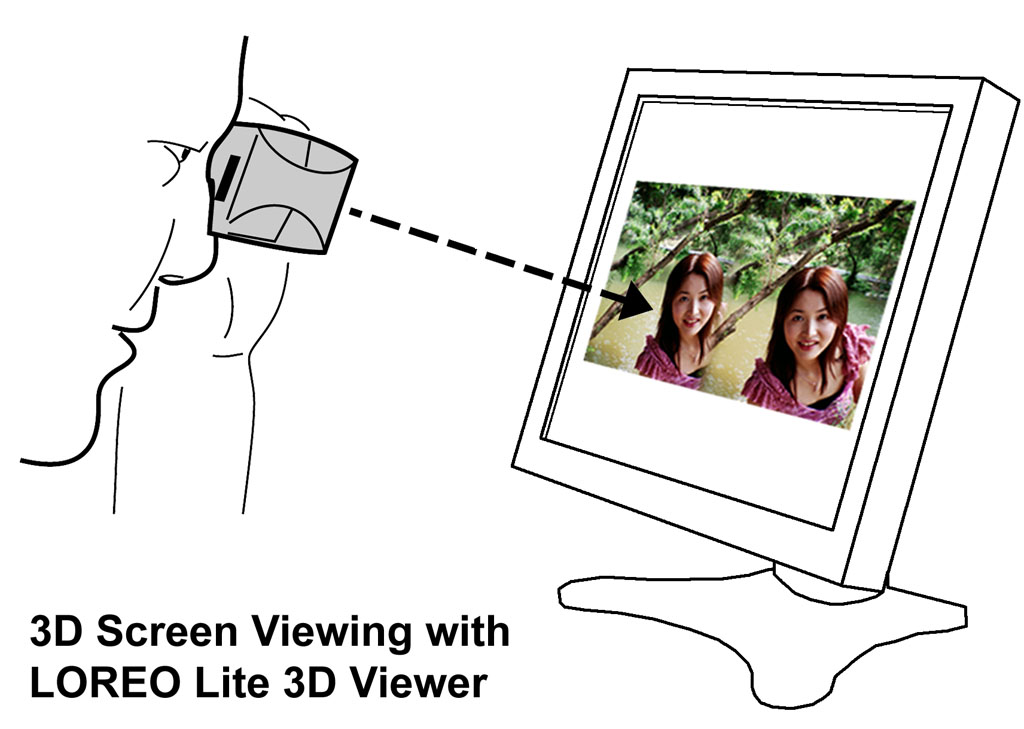
Viewing LOREO 3D pictures on Screen:
With the rise of digital photo processing, many people no longer make prints from film. Instead, entire rolls of film are scanned onto photo CDs, and digital 3D pictures are viewed on computer screens, sent to friends an uploaded to the web. The Loreo Lite 3D Viewer which is part of the standard Photokit MKII 3D Camera Set is excellent for viewing small to medium sized onscreen images. Optimum viewing size is 6-8 inches across.

Sharing LOREO 3D pictures:
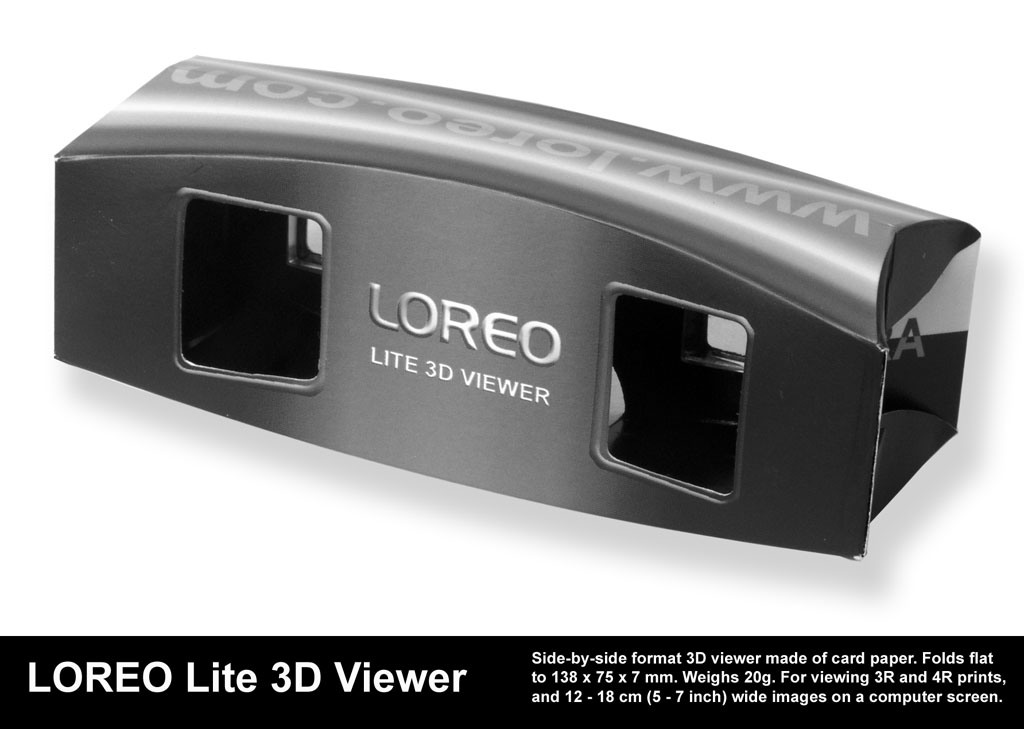
Each LOREO Photokit MKII 3D Camera comes with a foldable, mailable Loreo Lite 3D Viewer. This is a Parallel Format (side-by-side) Print Viewer made of card paper. It also works well as a Computer Monitor Viewer for medium sized images. It folds flat to the thickness of its lenses (7 mm) and fits into a 4R (4 x 6) photo album sleeve. It is suitable for viewing 3R and 4R (optimum) prints, and 5 - 7 inch wide images on a computer screen. Send 3D prints and images to friends and family along with this lightweight viewer to view them with. This handheld viewer also makes it easier to view prints in photo albums, instead of having to pull them out and put them in the deluxe viewer.
Scanning Photokit MKII Photographs
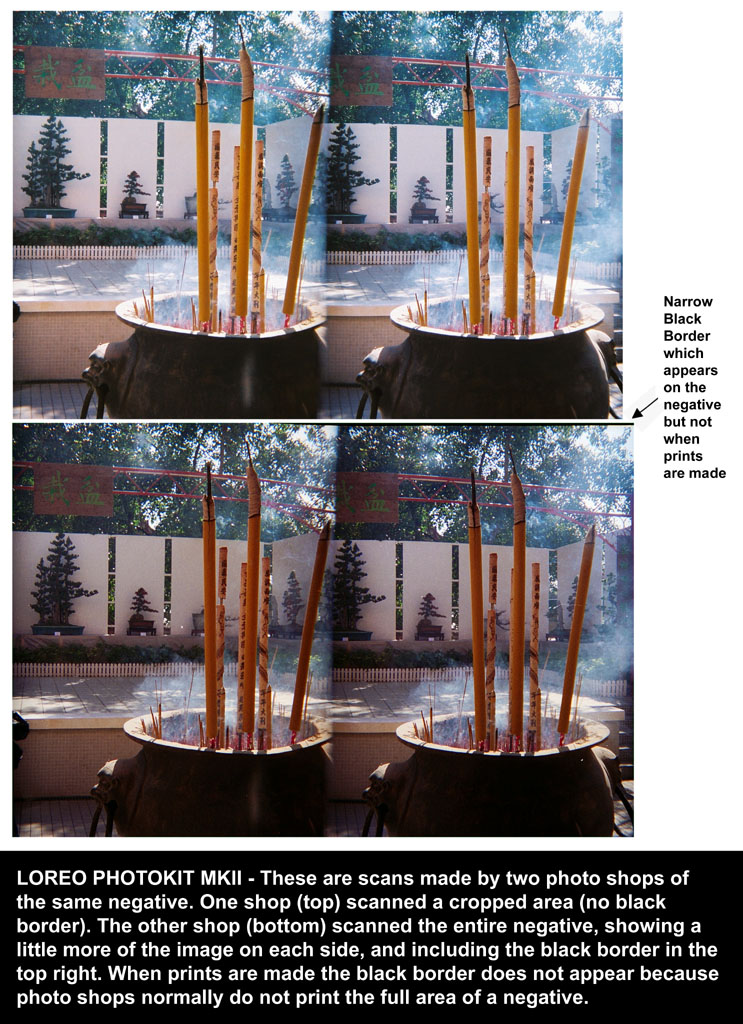
A narrow, slanting black border appears on the negatives of many Photokit MKII cameras. It is caused by the unconventional curved film plane of the camera, which corrects keystone effect, but is not ideal for locking down the film. The original Photokit and Photokit MKII were designed as film and print cameras, and built within tolerances which allow for a black border.
When people make prints from MKII negatives with this black border it doesn't appear because very few photo developing shops print the entire negative. Here is a pair of negative scans of an MKII picture. The two scans were done by two different shops. Note the difference in color hue and contrast. While one shop scanned a cropped area (no black border), the other shop scanned the entire negative, showing a little more of the image on each side, and including the black border in the top right.

In practice, the cropped area is quite sufficient for making 3D prints. If the shop you use scans the entire area of the negative and there is a black border in the top right, you will need to crop the image before putting it on a website.
Why you see your LOREO picture 3-dimensionally (stereo)
The finished LOREO prints will automatically show two pictures of the scene you recorded. These two pictures are horizontallly slightly shifted because the two camera lenses are at differing horizontal positions (as your eyes are). You can observe that a certain object in the image, a vertical line or a point as an example, is at unequal distance from the border of the left and right picture.
To see the natural three dimensional scene again one has to have an instrument that allows the left eye to see only the left picture and the right eye to see only the right hand picture. This is the purpose of the LOREO Stereo Viewer.
Viewing 3-D pictures is a different process than that of viewing ordinary prints, which are viewed at one glance and on one surface. When viewing stereo pictures, you will notice that your eyes can wander, exploring the picture in depth and focusing your attention separately on objects near or far, as people actually do while taking in a natural scene.
Lens Shade
To improve the constrast of your stereo prints a Lens-shade is specially designed for your LOREO stereo camera. It is attached to the front panel of the camera by a tongue and groove joint. It is particularly effective in shielding against bright light shining from either side of the camera. Without the Lens-shade this stray light could otherwise appear as ghost images on your stereo photographs.
Please also read the guide to taking good Stereo
Photographs.
- - - - -
Return to the Loreo Homepage.
E-mail: info@loreo.com
|